Web Licensing - How to associate a license using the Exelis VIS web licensing portal
THIS INFORMATION ONLY PERTAINS TO SOFTWARE VERSIONS IDL 8.5, ENVI 5.3 AND PRIOR
This Help Article will assist with how to combine/associate licenses using the Exelis VIS web licensing portal.
When will licenses need to be associated?
Licenses that will be running on the same system will need to be associated prior to placing them on the system in order to run properly. This includes both node-locked licenses, as well as floating licenses that will be served from the same system. This typically occurs when you have purchased a separate license for a module for either ENVI or IDL, but can also occur when multiple ENVI or IDL licenses are going to be served from the same server machine.
Due to the license file formatting, licenses that are not associated will fail to run through the license manager system, or cause error messages when attempting to access functionality included in Exelis VIS software.
How do I associate licenses?
To begin the license association process, the licenses must be current under maintenance. If your license has expired or you have any questions regarding the maintenance eligibility of your licenses, please use our Contact Us page.
You will also need to make sure you have administrative access to the licenses you would like to associate. For assistance with the user types as well as how to add these permissions, please see our user role Help Article, 5348.
To associate a license using the web licensing portal, please follow the steps below:
1. Access either of the licenses using the web licensing portal, under Licenses > My Licenses, then select the license number.
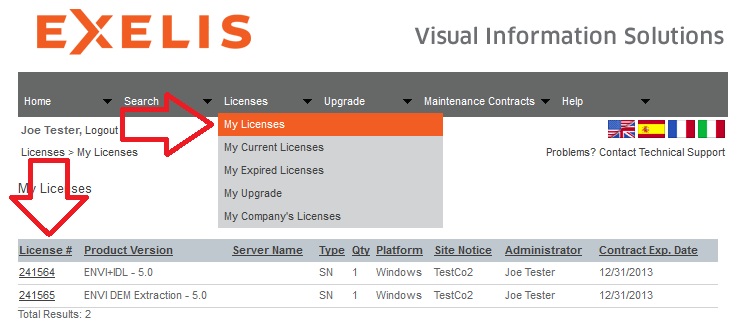
2. If you have not done so already, activate the license using the system information that the license will be tied to. For assistance with this process, please see the web licensing help pages.
3. After the license has been activated, select the "Show Associated Licenses" drop down menu. Figure 1 below will show the menu prior to expanding, while Figure 2 will be after expanding:
Figure 1:

Figure 2:

3. Select the license you would like to associate using the drop down menu, then select Associate License (NOTE: If the Associate License button is grayed out, then you will need to select the "I agree to remove..." checkbox at the top of the license page):
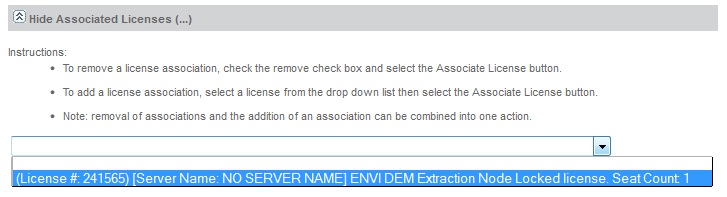

4. Confirm by selecting OK on the menu that appears.
5. The page will refresh, and feature a license file that contains all associated license numbers. You can then e-mail a copy of the license using the "Email License" button, or copy and paste the contents to your license file.
If you encounter any errors during the association process, please contact Exelis VIS technical support for assistance.